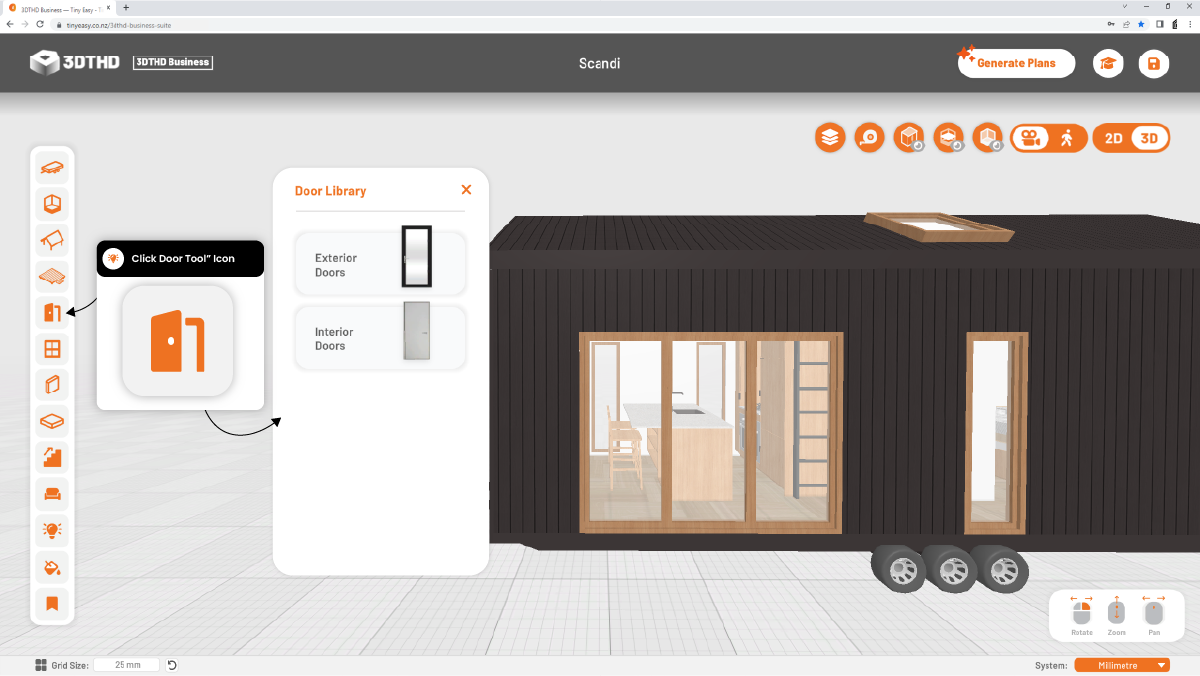
Door and Window Menu
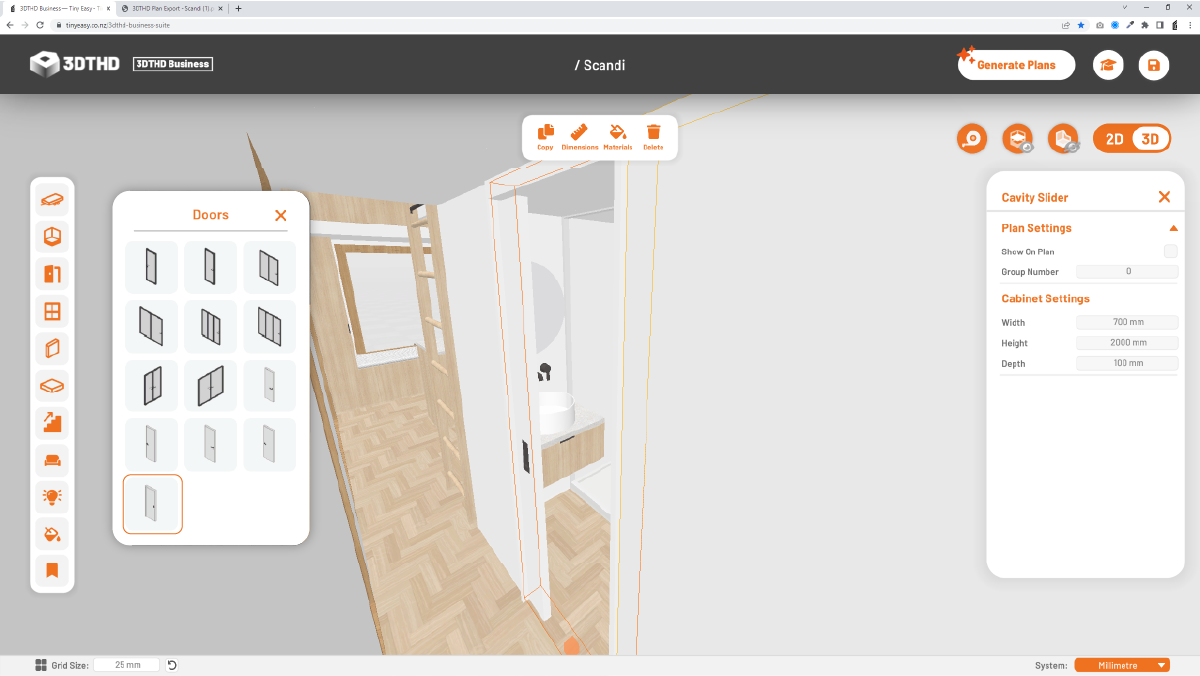
Door Menu
The Door Menu has a Library of preset Exterior Doors and Interior Doors. The Exterior Doors have a black frame, and the Interior Doors have a white frame. You can place Exterior Doors on the shell, and you can place Interior Doors in the interior.
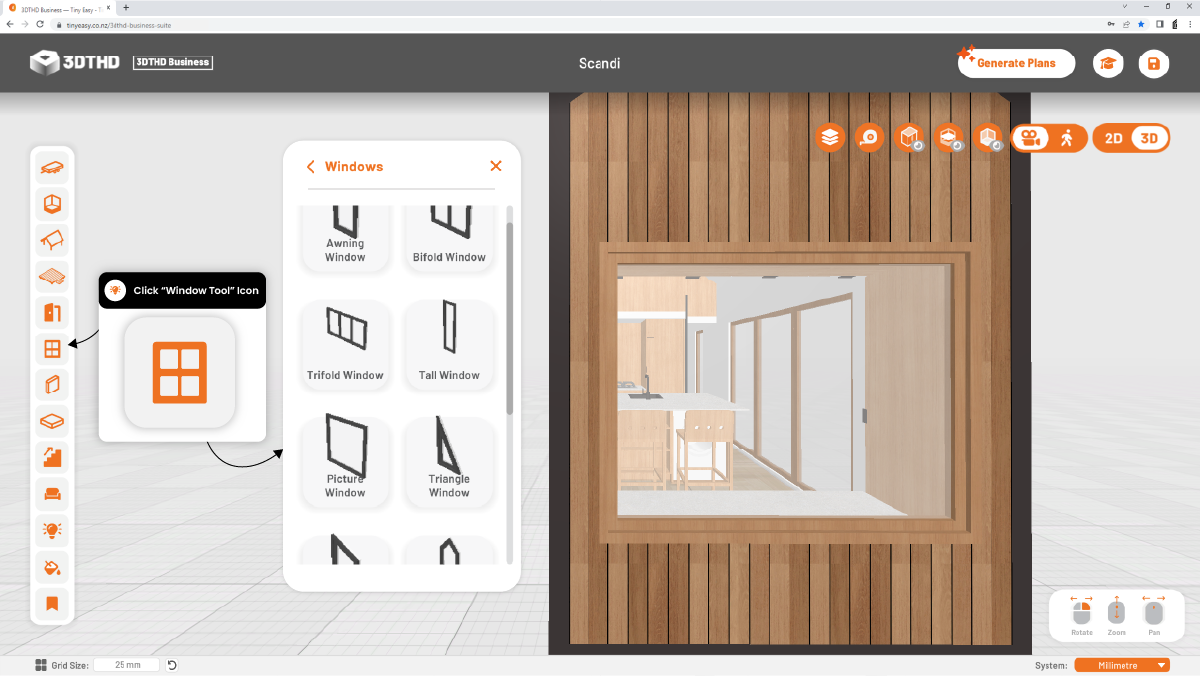
Window Menu
Windows uses the same system as Exterior Doors however, Windows and Doors are seperated into their own rows in the Joinery Schedule.
You can choose from a wide range of windows in the window menu.
The standard window types can be found at the top of the menu, such as:
- Awning
- Bifold
- Trifold
Special Windows - 🌟New🌟
01/06/23
Special windows such as angled windows are the latest update to the window menu.
You can find windows types such as Trapezoid, Pentagon, etc toward the bottom of the window menu.
To avoid a Window from appearing as a Door in the Joinery Schedule, drag in a Window preset from the Window Library and modify it to suit your requirements rather than copying over a door and turning it into a window.
Skylights!
14/04/23
Skylights uses the same system as windows, so you know the drill, simply add the skylight and adjust the settings as per a standard window!
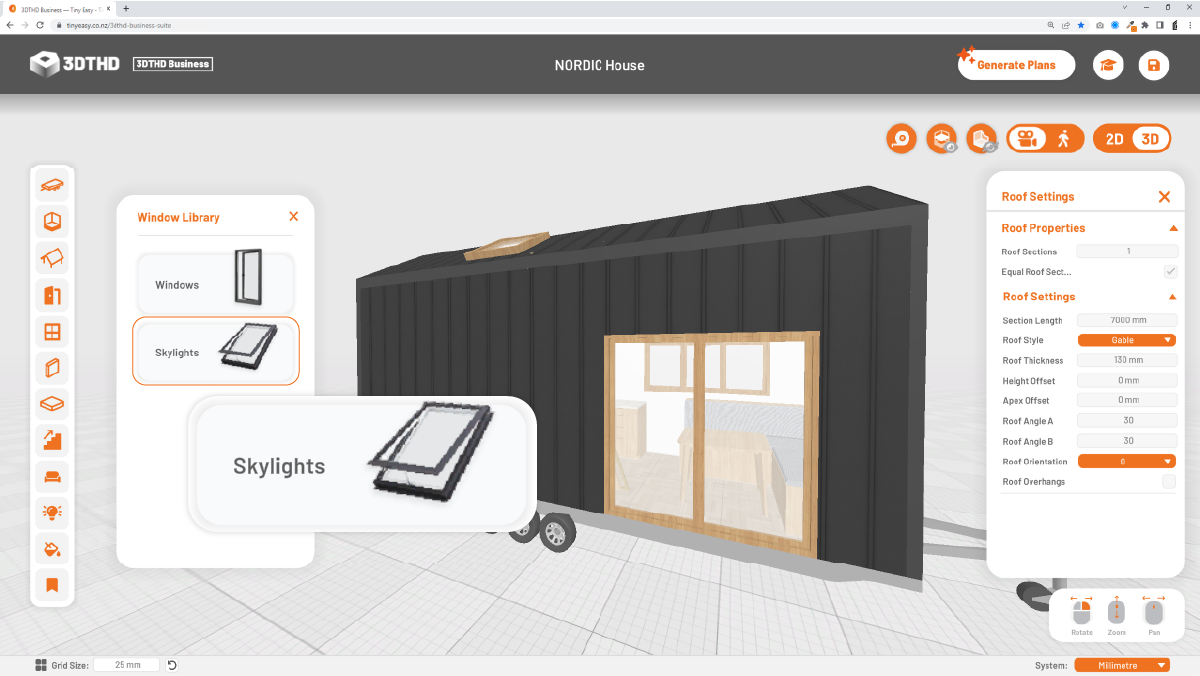
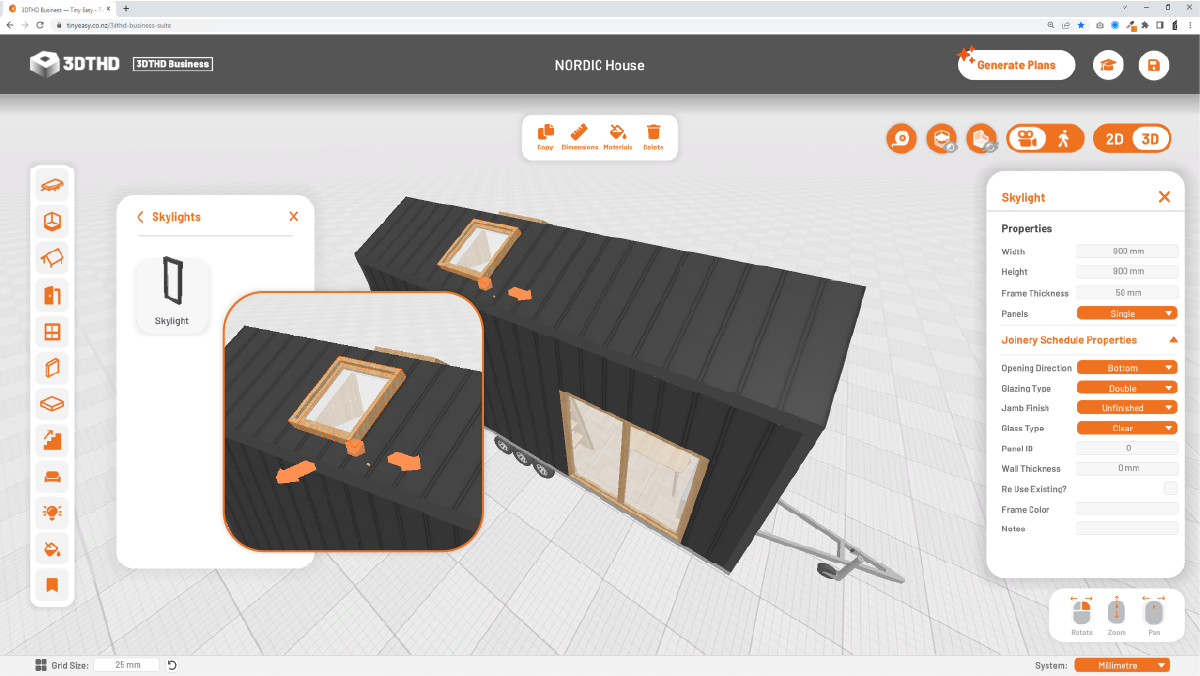
Place the skylights from the exterior, instead of placing them from inside.
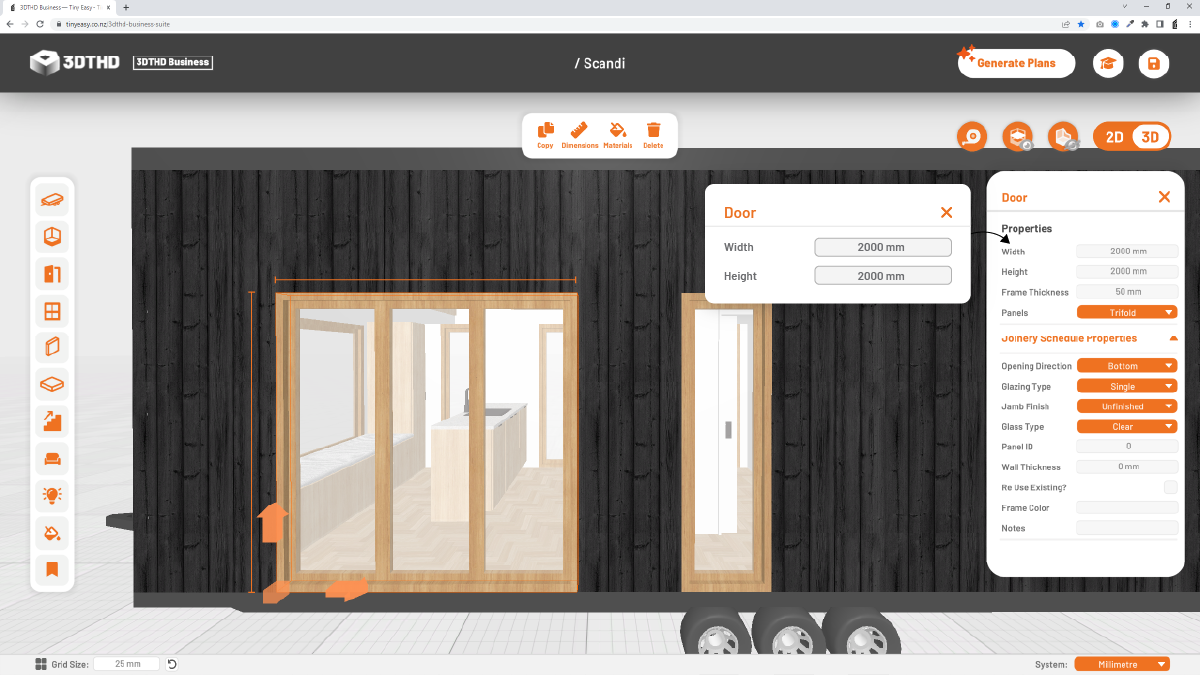
Window/Door Properties
Windows and Doors can be placed on your tiny house shell. They automatically snap to your exterior walls and cut out the opening you need to place them.
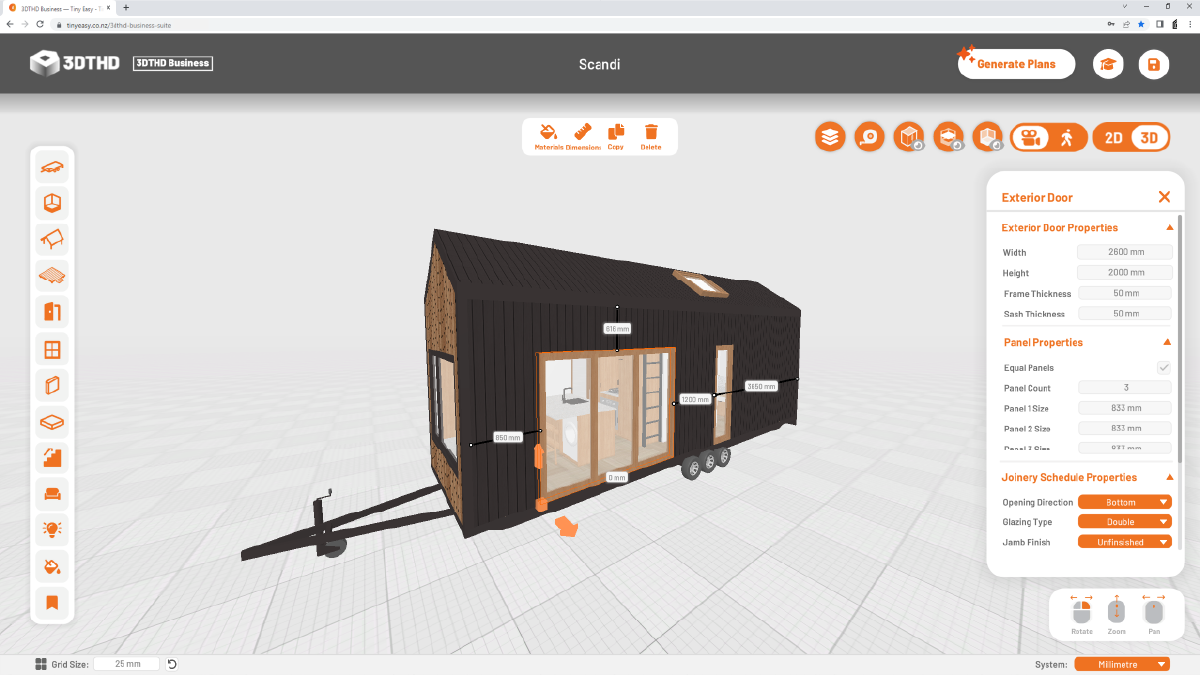
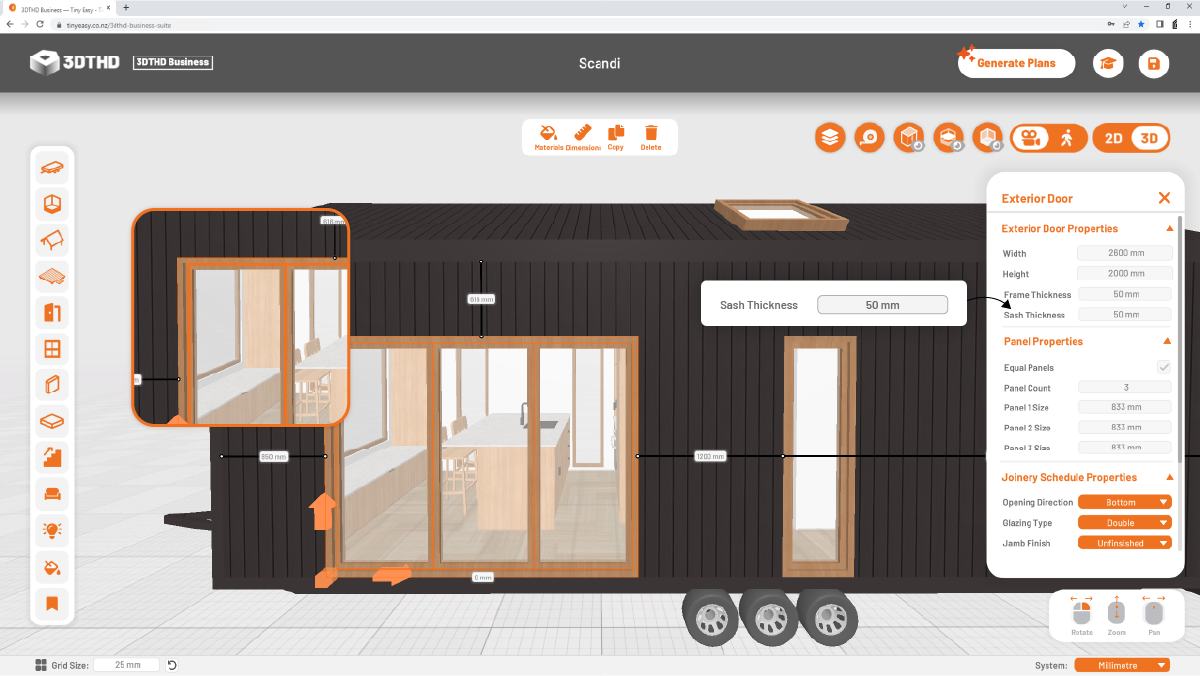
You can create any exterior door configuration you need for your tiny house designs. The presets in the library are a great starting point, and you can modify each door you’ve placed to suit your needs in the Properties panel that pops up when selecting an exterior door.
Width/Height
Change the width & height of your door.
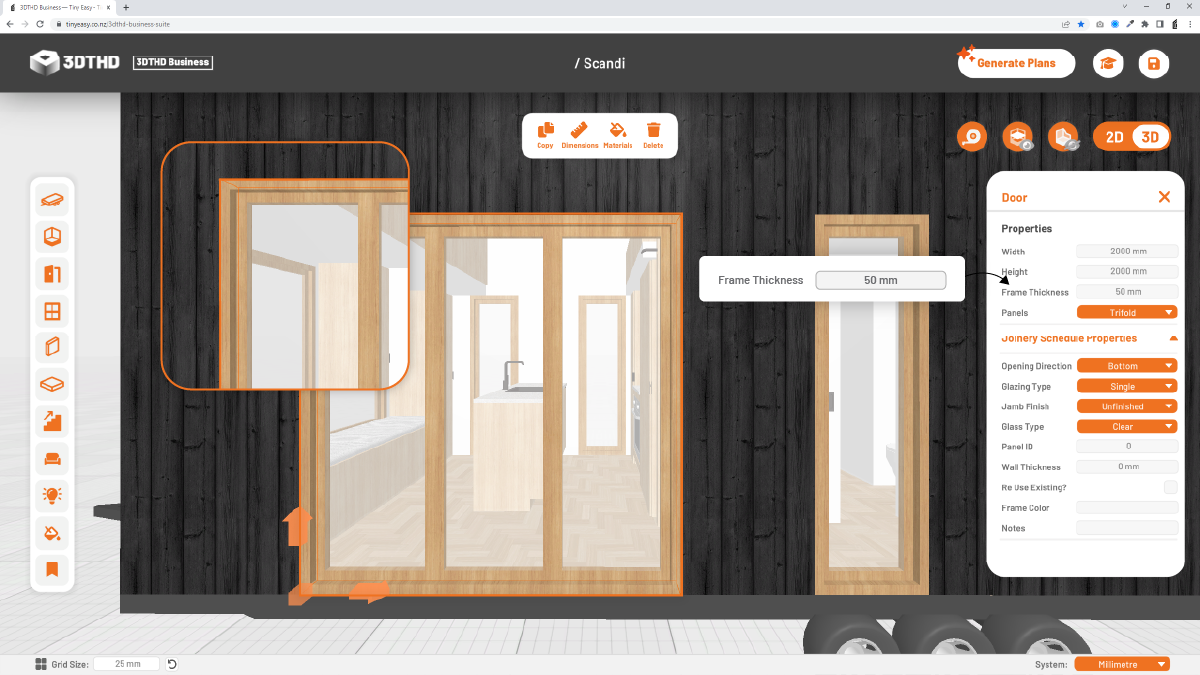
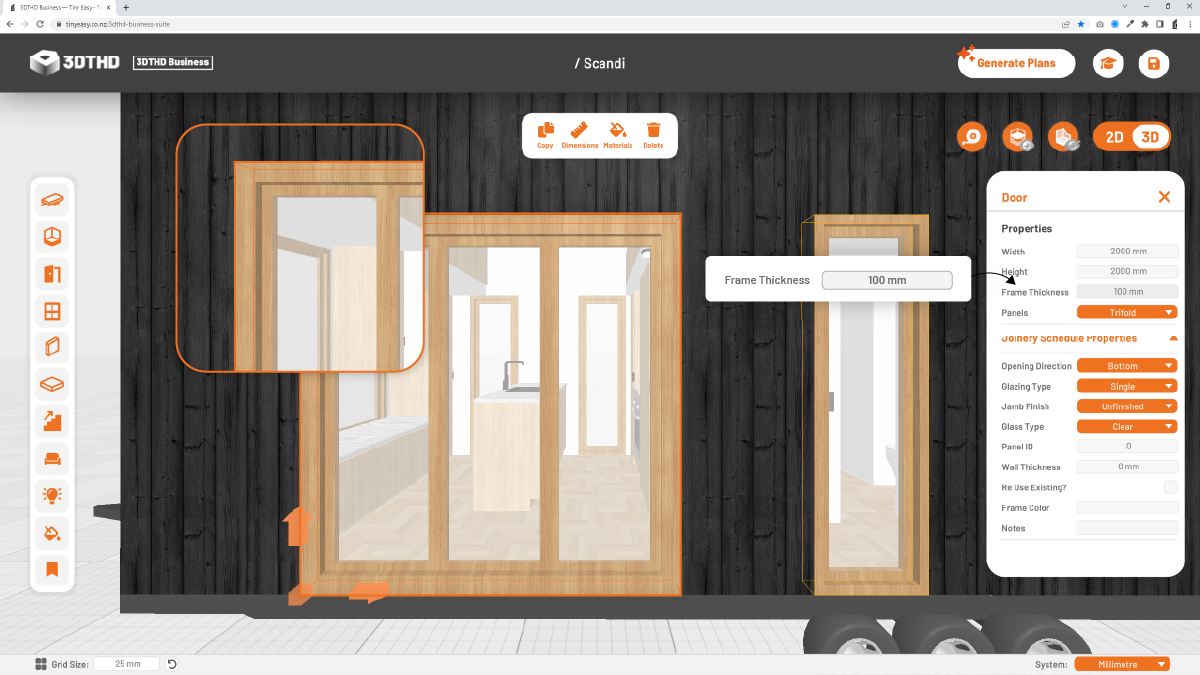
Frame Thickness
Enter the frame thickness to change the visual appearance of the window frame. Below you can see the difference between a 50mm & 100mm frame thickness.
Small Frame Thickness Large Opening
Large Frame Thickness Small Opening
Sash Thickness
Enter the sash thickness to change the visual appearance of the sash of each window/door panel. This is the thickness of the frame surrounding the glass panel.
Horizontal Panels
All windows (Excluding doors and skylights) have the option to arrange all panels either horizontally or vertically. Most windows come with the horizontal panels option enabled.
When enabled all window panels are arranged from the left to right when facing the window from the outside. (This is important to know if you want to modify a window on a per panel basis as explained below.)
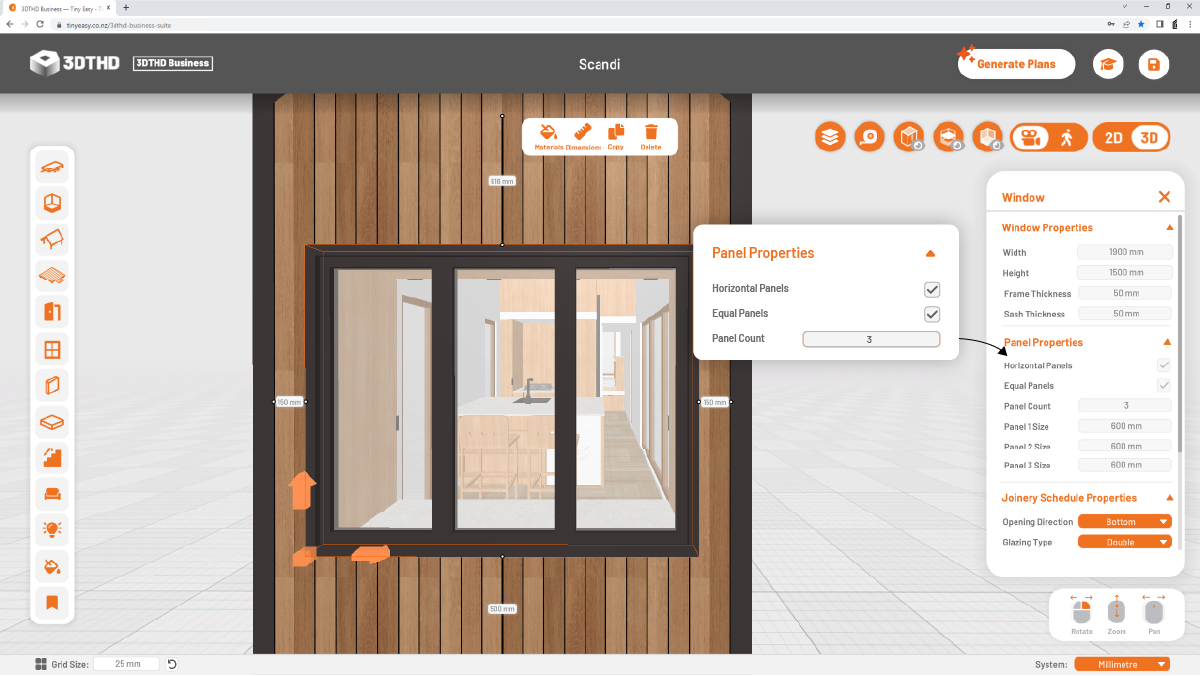
When disabled, all window panels are arranged from the bottom to the top.
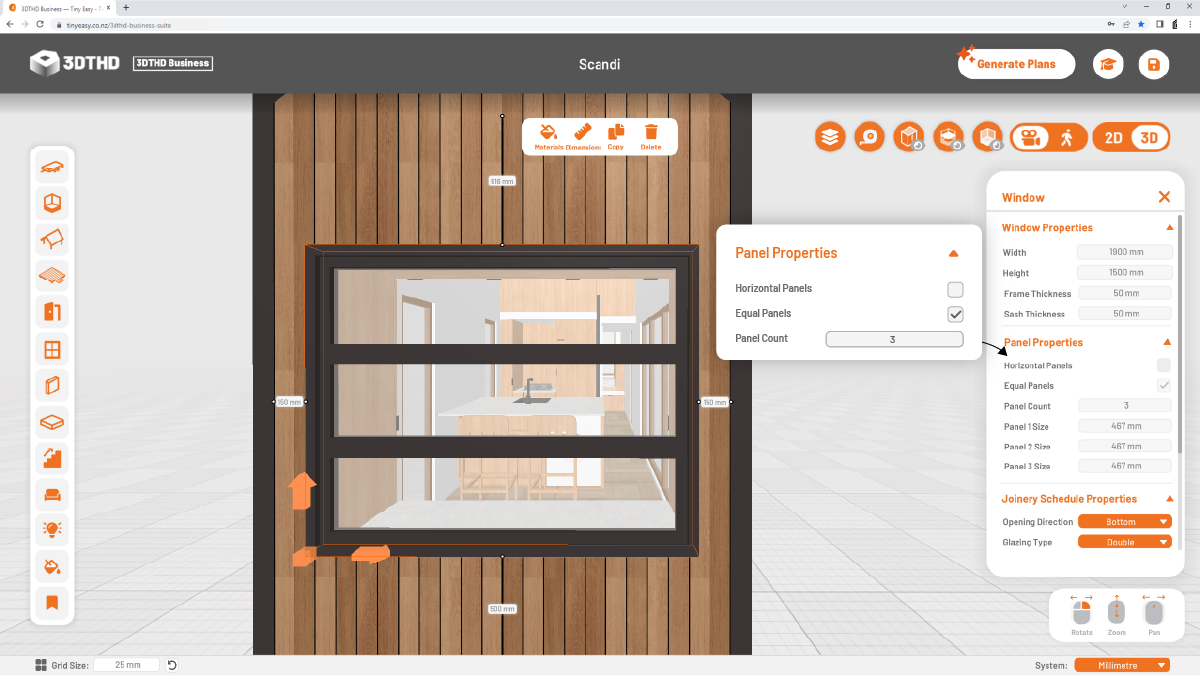
Equal Panels
Choose whether all window/door panels should be divided equally along the width of the window/door. Disabling this setting will allow you to enter the exact size of each panel.
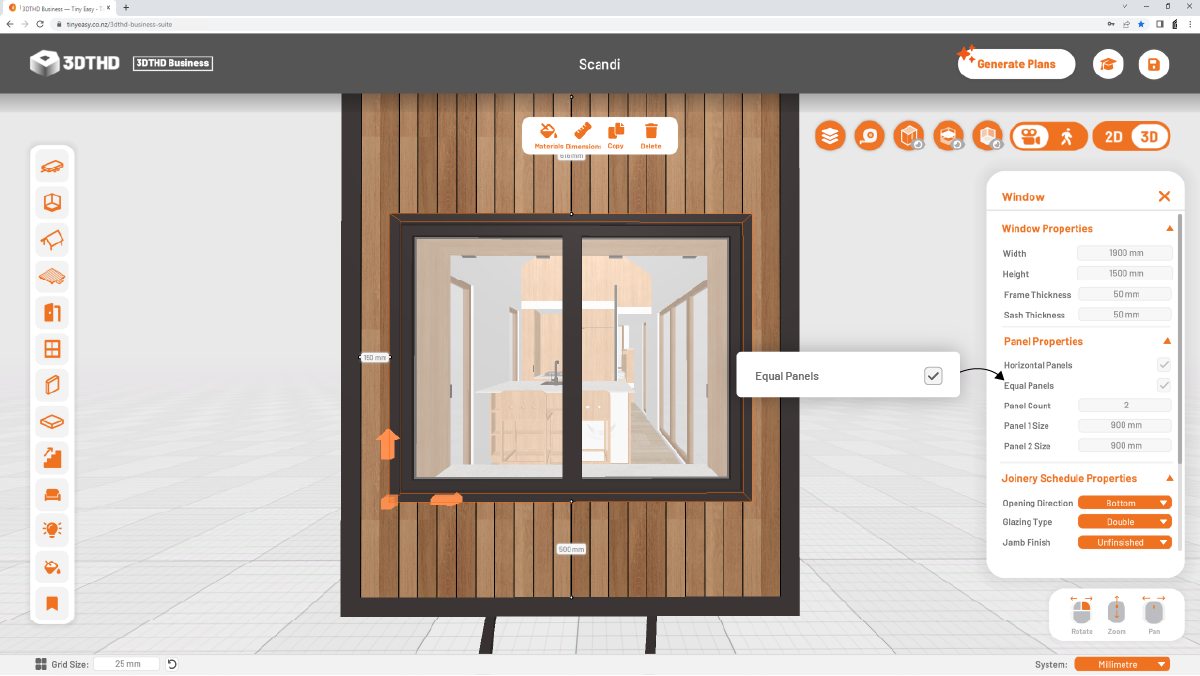
Panel Count
Choose the panel count of your window / door from 1 - 4. Type your desired amount and the window/door will resize automatically.
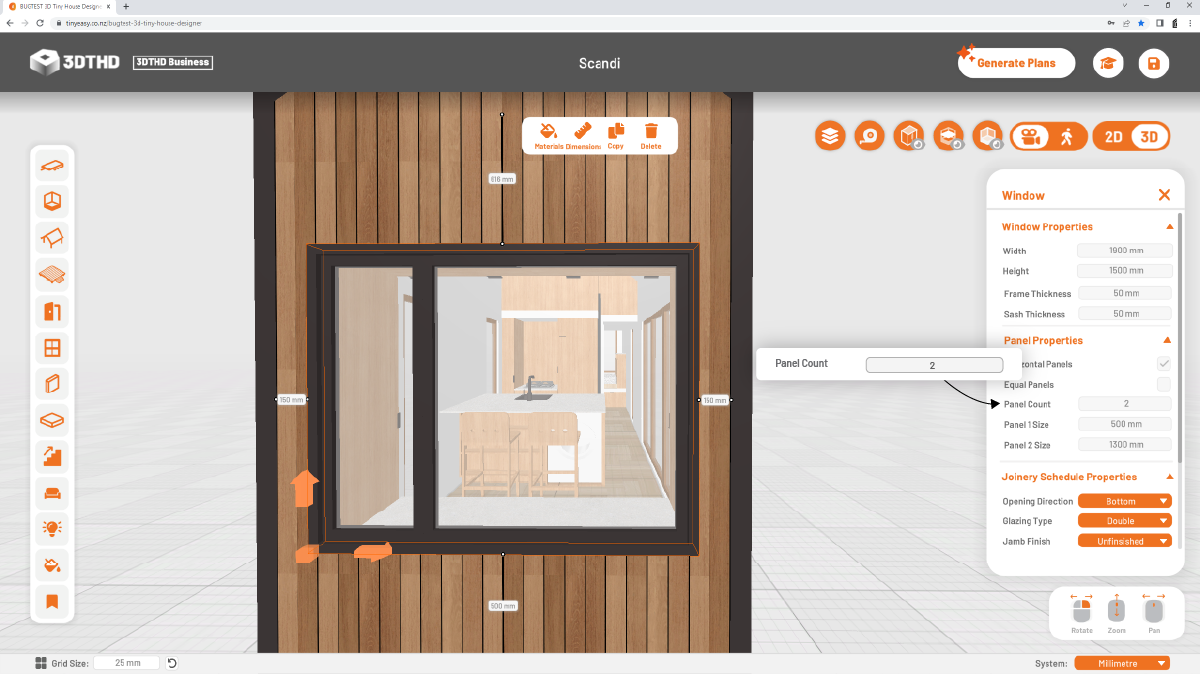
Panel Size
You can specify the size of each panel using the panel size setting. Once confirming a specific panel size, the window/ door will regenerate it's panels and re-size the remaining panels to suit the entered dimension.
All panel sizes apart from the last panel can be modified. The last panel size is calculated from all other remaining panel sizes.
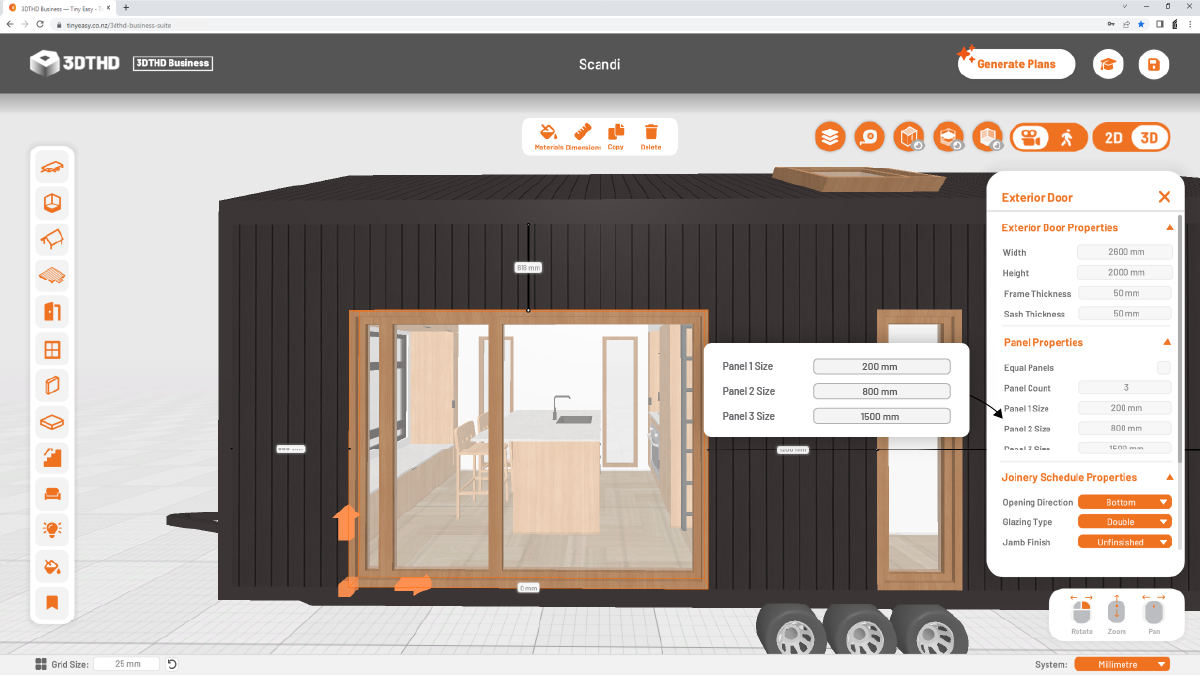
Eg: A a door with an overall size of 1600mm and a frame thickness of 50mm has 3 panels all equal at 500mm. When changing the second panel to 800mm the door will update to panel sizes: 1 = 500mm, 2 = 800mm, 3 = 200mm (1600mm - 50mm - 50mm - 500mm - 800mm = 200mm)
Special Window Properties
Some windows doors have properties unique for their specific window / door style. You can find more about all window / door styles HERE.
Joinery Schedule Properties
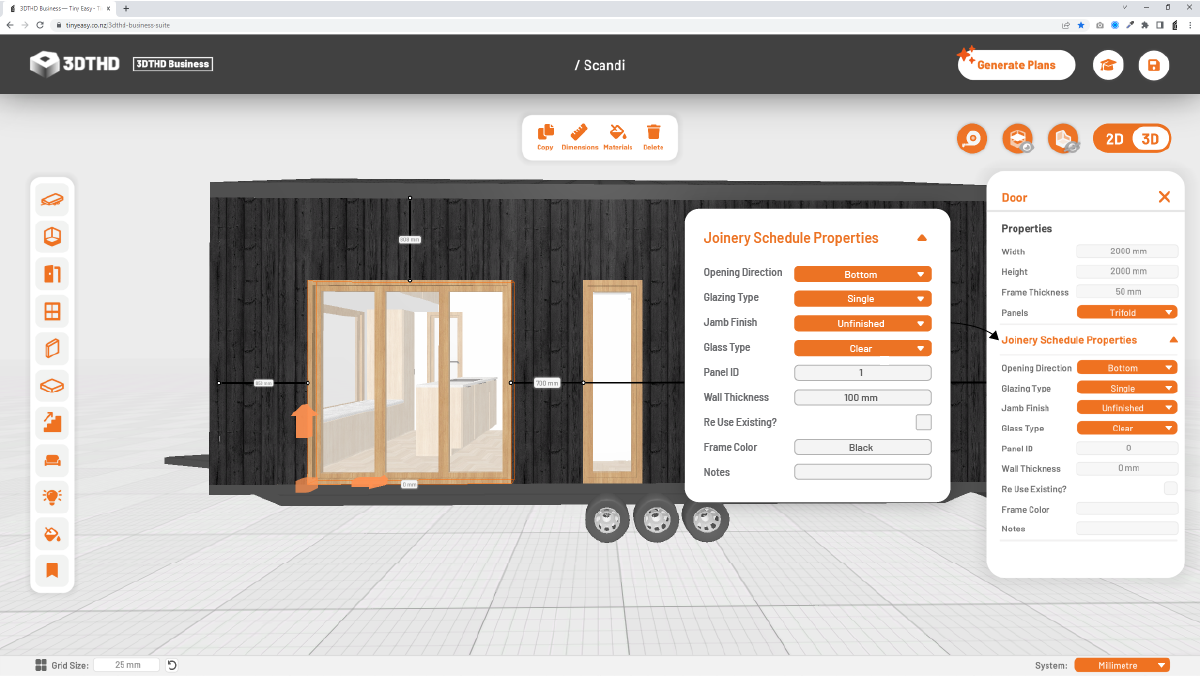
All Doors and Windows in your tiny house are “Smart Objects”. You add all the required information to the Door/Window while designing your tiny house, which then automatically populates your Joinery Schedule.
E.g. if you update the specifications of a window while designing, this directly carries over into your Joinery Schedule to avoid discrepancies between the design and the Joinery you’re ordering from your manufacturer.
Before exporting your plans, check through each door & window & make sure that you have filled out the Joinery Schedule Properties for each object.
Opening Direction
Specify the opening direction of your Door or Window. You can choose from Left, Right, Bottom, Top and Fixed.
Glazing Type
Choose the Glazing Type of your Door/Window. You can choose from single, double, triple, and quadruple glazing.
Jamb Finish
Choose if the Jamb Finish should be Unfinished, Pre-Primed or Painted. This helps communicate the level of finish with your Joinery Manufacturer.
Glass type
Specify if the glass panels have a particular finish. E.g. Is your panel clear or frosted?
Panel ID
The Panel ID gives the Window/Door a unique number that is referenced in the joinery markers in the elevations and the Joinery Schedule.
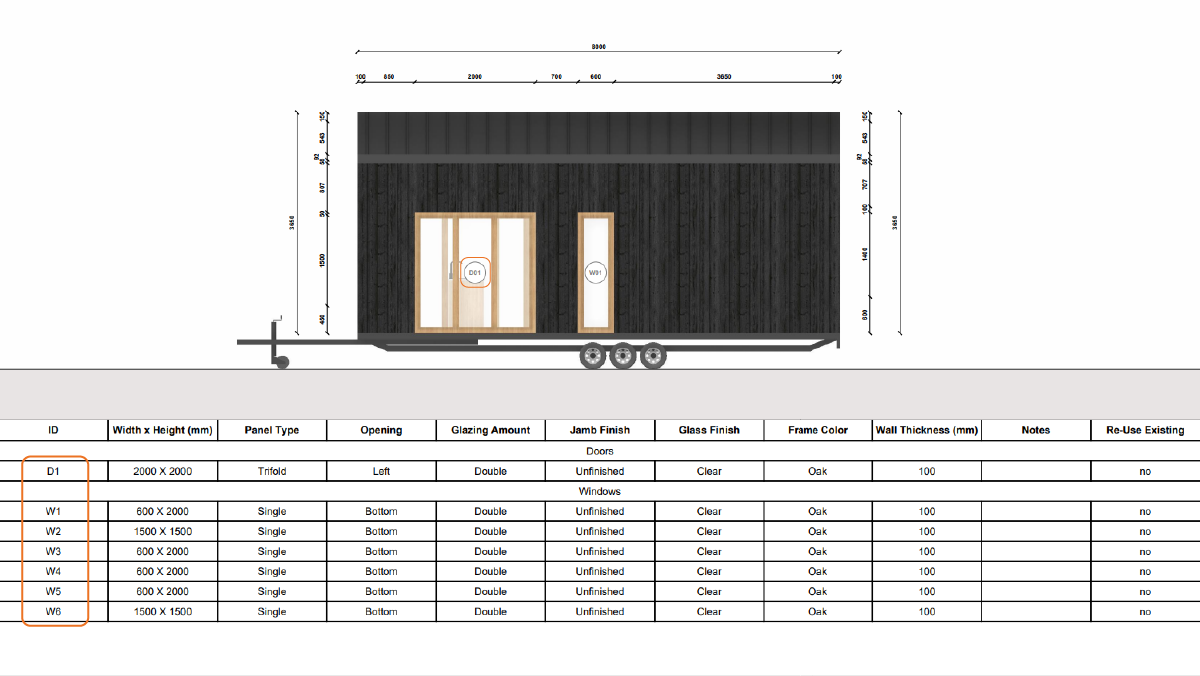
Give each Door/Window a unique panel ID to make sure each object is easily distinguishable and there are no double-ups. Doors and Windows have separate IDs, so there can be a Door panel with ID 1 and a Window panel with ID 1.
Wall Thickness
The Wall Thickness is automatically taken out of the Shell Properties we specified earlier while designing the Shell. However, if you entered the Wall Thickness based on the frame size and interior lining thickness, you might need to enter a different dimension to make sure the window/door also works with your cladding.
Enter the final Wall Thickness in the Wall Thickness tab to ensure that your Windows/Door match your wall build-up.
Re-use Existing
Tick the box if you are using a window that you already have on hand and don’t need to have manufactured. This is helpful as you can show the Window/Door in the model, but advice your manufacturer to not build this specific panel as you already have it on hand.
Frame Color
Enter any frame colour to match your manufacturer’s range.
Notes
Add any other comments to communicate with your manufacturer.
Interior Doors are not included in the Joinery Schedule as they are usually manufactured by different suppliers. Simply get the interior door sizes by selecting the interior door in the scene, and note the size manually.
Interior Doors
Interior Doors work differently from Exterior Doors. Interior Doors are placed on the tiny home's floor and work similarly to Interior Walls.
To place an Interior Door, pick a preset from the Door Menu and hover your mouse over the floor of the tiny house. Left-click to drop the Door into your design.
You can adjust the Interior Door's Width, Height, and Depth, to fit the Interior Door into the wall opening.
Interior Doors currently don't show up on the Joinery Schedule. We will add this functionality soon.